Introduction
The AC installation process typically includes system sizing, equipment selection, ductwork inspection, installation of indoor and outdoor units, refrigerant line setup, and final performance testing. Each stage is critical to ensuring reliable cooling. Investing in a new central cooling setup represents a substantial financial commitment to your property’s infrastructure.
Core Takeaways
- Professional installation follows a structured workflow: assessment, sizing, installation, and commissioning.
- Proper system sizing using Manual J calculations is critical for efficiency, comfort, and equipment lifespan.
- Installation quality depends heavily on correct refrigerant handling, duct integrity, and electrical configuration.
- Final performance testing ensures the system operates within manufacturer specifications and delivers balanced airflow and cooling.
- Hiring certified HVAC professionals reduces the risk of installation errors that can significantly impact performance and energy costs.
The 10 Essential Steps of a Professional AC Installation
Achieving absolute efficiency and total operational safety requires strict adherence to a multi-phase technical deployment protocol. The following comprehensive breakdown illustrates the procedure executed by qualified cooling technicians during a home comfort upgrade.
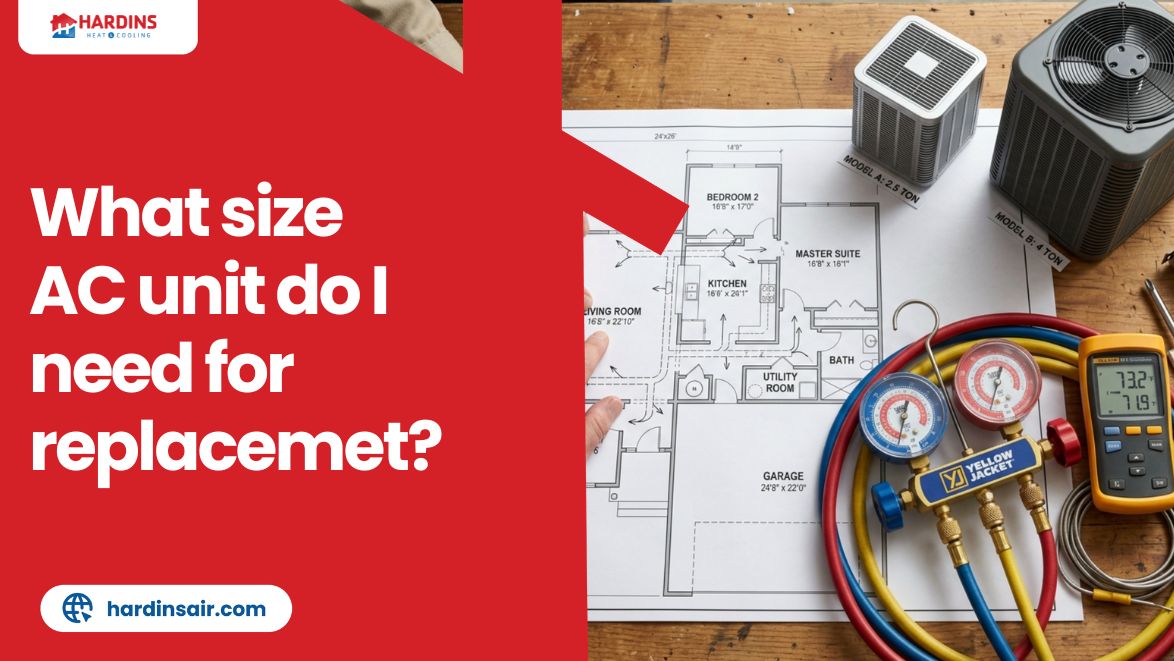
1. Conducting an Exact Mechanical Load Analysis
A flawless professional mechanical setup never begins with unboxing new equipment; it starts with an advanced architectural evaluation. Professional installers avoid relying solely on general estimation rules like matching equipment size solely to basic building square footage. Instead, professional installers run a rigorous, data-driven Manual J load calculation to prep for an AC installation. This technical calculation evaluates the precise spatial volume of the home, local weather patterns, the insulation value of the wall cavities, ceiling heights, and the directional orientation of the windows. Discovering the exact British Thermal Unit (BTU) performance requirement prevents short-cycling issues where a system turns on and off too fast, leaving the indoor air feeling damp, humid, and uncomfortable.
2. Safely Recovering Refrigerant
Before any structural work can begin on the physical layout, technicians must isolate and clear out the old cooling unit without exposing the environment or the building to hazardous materials. Environmental safety laws require that all refrigerant be carefully managed before beginning the fresh AC installation project in Yukon. Installers attach specialized, commercial-grade recovery pumps to the old compressor lines to draw every drop of chemical fluid out of the building. The material is captured inside certified, heavy-duty recovery cylinders for safe transport to authorized treatment facilities, ensuring full compliance with national clean air standards.
3. Reviewing and Reinforcing the Indoor Ductwork Network
A brand-new, high-efficiency cooling system cannot deliver its promised utility savings if it is forced to blow air through cracked, leaking, or restricted sheet-metal passages. Air distribution lines often settle, split open at the seams, or become severely restricted over decades of service. Technicians thoroughly inspect the entire duct system, looking for dropped junctions, structural air leaks, or poor directional layouts that create heavy static resistance. They seal vulnerable seams using long-lasting mastic compound or heavy-duty foil tape and reshape restricted runs to ensure that the new blower motor can move air cleanly without overworking.
4. Pouring and Calibrating the Condenser Leveling Foundation
The exterior condensing unit houses the hardest-working component of the loop: the compressor. This heavy mechanical asset generates continuous structural vibrations during normal operation, meaning it must rest on a perfectly flat, immovably stable outdoor platform to protect internal parts. Homeowners typing in queries for an AC installation near me often overlook this crucial foundation work. Installers carefully clear away shifting soil, gravel, and organic debris next to the foundation to lay a heavy, weather-resistant equipment pad. They utilize precise spirit levels to ensure the pad sits flat, preventing compressor lubrication issues that could negatively affect compressor operation.
5. Mounting and Sealing the Internal Evaporator Element
The interior component of your cooling system, the evaporator coil, is responsible for extracting thermal energy directly out of your indoor air supply. It must sit cleanly within your main furnace plenum or air handling cabinet to capture all passing air currents. Technicians carefully mount the heavy coil assembly, building custom sheet-metal transitions if the new component varies in shape from the legacy unit. They utilize high-temperature foil seals to wrap the entire casing airtight, guaranteeing that no conditioned air escapes into unconditioned crawlspaces or mechanical closets, maximizing the delivery of cooled air into the living spaces.
6. Running and Insulating the Main Line Set
The physical link connecting your indoor and outdoor components consists of two specialized copper lines that carry the system’s thermal medium. The larger line handles cold, low-pressure gas, while the smaller line transports warm, high-pressure liquid. Professionals route clean, thick-walled copper tubing through your building’s exterior envelope using specialized bending tools to avoid creating sharp kinks that could choke fluid movement. They wrap the suction line in heavy, closed-cell foam insulation sleeve layers to prevent hot outdoor air from warming the cold gas before it reaches the compressor.
7. Completing High-Strength Oxygen-Free Brazing
Connecting copper line points together requires much more strength than basic electrical soldering can provide. Technicians use oxygen-acetylene torches to braze critical line fittings with high-grade silver alloy rods at temperatures exceeding 1,200 degrees Fahrenheit. While performing this task, professionals continuously pump a low-pressure stream of dry nitrogen gas directly through the copper tubes. This critical step displaces oxygen within the line, preventing the formation of black copper oxide flake deposits that would otherwise break free and clog the expensive internal valves of your new compressor.
8. Conducting a High-Pressure Nitrogen Test
Once all brazed joints are cool to the touch, the entire closed loop must be tested against leaks before any expensive chemical fluids are introduced. Small, microscopic pinhole leaks can easily escape basic visual checks. Installers seal the line system and inject dry nitrogen gas into the loop until internal pressures reach up to 400 pounds per square inch (PSI). They monitor specialized digital manifold gauges over an extended window to confirm the pressure remains rock-solid, proving that every brazed seam is completely airtight and ready for the final vacuum process.
9. Pulling a Deep Vacuum for Total Moisture Dehydration
Even if a system holds pressure perfectly, the air inside the lines contains moisture and non-condensable gases that will destroy compressor components over time if left inside. Water molecules combine with system oils to create highly destructive acids. Technicians connect a heavy-duty mechanical vacuum pump along with a precision digital micron gauge to draw all remaining air and moisture out of the lines. They pull the system below target micron levels and isolate the lines to verify that the system maintains the vacuum, helping confirm moisture and unwanted gases have been removed from the loop.
10. Executing the Final System Commissioning Protocol
With the lines verified dry, clean, and tight, the technician releases the system’s refrigerant charge or weighs in additional fluid using highly accurate digital scales. They then power on the system to conduct a comprehensive performance audit. Installers measure the precise electrical current drawn by the motor components, verify the total volume of air moving through the vents, and calculate total superheat and subcooling parameters. Tuning these operating data points precisely ensures the machinery achieves its absolute maximum efficiency score right from its first operational hour.
What to Expect on Installation Day
A professional AC installation follows a structured on-site workflow designed to minimize downtime while ensuring technical precision. Most standard residential replacements are completed within one working day, though complex duct modifications or electrical upgrades may extend the timeline.
The process typically begins with system shutdown and safe removal of the existing equipment. During this phase, technicians may temporarily disconnect electrical supply and refrigerant lines, making the system non-operational for several hours.
Homeowners should expect moderate noise levels from cutting tools, vacuum pumps, and brazing equipment. Access to indoor mechanical areas such as closets, attics, or basements is usually required throughout the installation window.
To prepare, professionals recommend clearing pathways to indoor and outdoor units, ensuring electrical panels are accessible, and securing pets away from work zones. In some cases, ventilation may be limited temporarily while ductwork or evaporator coil connections are being modified.
Once installation is complete, technicians perform system commissioning and basic airflow testing before restoring full operation. The home typically returns to normal thermal comfort within a few hours of startup.
Cost Breakdown and Key Factors That Affect Installation Pricing
The cost of a professional air conditioning installation varies significantly based on system capacity, efficiency rating, and the condition of existing infrastructure. While baseline replacements using existing ductwork are more affordable, full system upgrades involving duct modification or electrical panel enhancements can increase total project cost.
Key pricing drivers include the size of the home, measured through Manual J load calculations, which determine required BTU output. Larger or poorly insulated homes require higher-capacity systems, which increases both equipment and installation costs.
Efficiency rating also plays a major role. High-SEER2 systems typically carry a higher upfront cost but reduce long-term energy consumption. Additional expenses may arise from duct sealing or replacement, refrigerant line upgrades, and condensate drainage improvements.
Labor complexity is another factor. Installations requiring attic access, multi-story routing, or structural modifications naturally demand more time and specialized handling.
Finally, permitting and inspection requirements may add minor administrative costs depending on local building codes. However, these steps are essential to ensure compliance, safety, and warranty validation.
Read Also: What causes weak airflow in HVAC systems?
Conclusion
Upgrading your home’s cooling infrastructure is a highly technical process that demands rigorous adherence to precise mechanical standards. As summer temperatures climb, safeguarding your household comfort means relying on experienced specialists who understand the unique structural demands of your local climate. For homeowners who demand honest pricing, meticulous technical precision, and absolute system reliability, partnering with the trusted local team at Hardin’s Heating and Cooling ensures your home comfort project is handled with professional care from start to finish.
Frequently Asked Questions
How long does a standard home central AC replacement project take?
A standard, straightforward change-out where the new equipment directly replaces a system on an existing foundation with working ductwork is typically completed within a single working day, usually requiring four to eight hours of on-site technical work.
Why is an oversized cooling system considered bad for a home?
An oversized unit cools down your interior space far too quickly and shuts off before it can complete a full operational cycle. Because the system runs in short bursts, it never has enough time to pull ambient humidity out of the air, leaving your home feeling cold, clammy, and sticky.
Should I replace my indoor evaporator coil when buying a new outdoor unit?
Yes, always. Air conditioning networks are explicitly engineered to run as perfectly matched component pairs. Attempting to run a modern, high-efficiency outdoor condenser alongside an aging, mismatched indoor coil severely degrades your efficiency, voids manufacturer warranties, and places excessive physical strain on the new compressor.